
Looking At Different Types Of Kites;

Google Kite Search;
Flying Animals - Birds, Bats
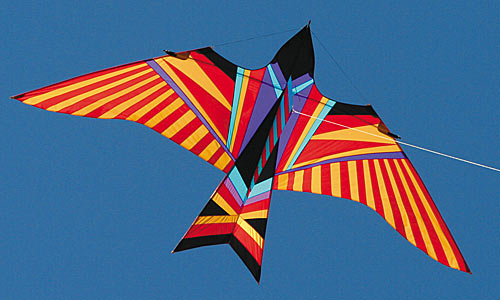


You wouldn't see them of a Night time, well possibly they could be visible, but I'll keep looking.
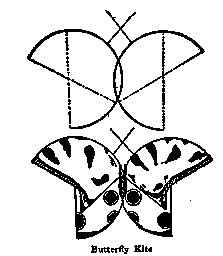
Insects- Butterflies, Bees;

Now a bee could work, the contrast between the black, yellow and white could be interesting, but would the black get lost in the sky?
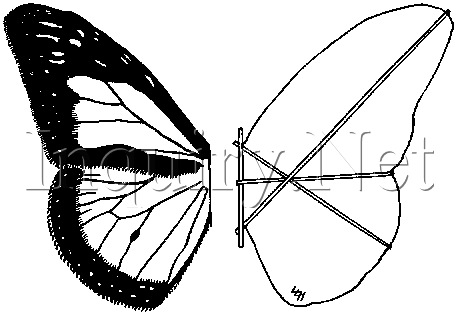
After looking over Google images I came across a butterfly kite design which I like quite a lot so using the paper overlay/cut out technique I am hoping to create a multi-coloured and very bright butterfly kite like these;


However, even bright paper might get lost in the dark sky, glow-sticks, glow in the dark paint could enhance the overall colours.
Trial Fluttering Butterfly kite;


Thinking of making a butterfly kite, I wanted it to flutter like a butterfly would; here I have just put a piece of dowel through the middle of a piece of paper, and after sticking it together I folded the paper over to hide the exposed wood. the wings did flutter, but the kite structure is not supported or sustainable.
How Can I support The butterfly?

This would support the structure of the kite but I could then loose the fluttering, however, I feel this would possibly work in my favour to not let the butterfly have fluttering wings instead, I can choreograph a flight pattern.
How to Make a butterfly- google search;

Quick initial sketches...


Materials needed;
Paper - various colours
Card - various colours
Wooden dowel
String/ fishing wire/Wool
Glue Gun?
Trial 1 quick mock up;


Trial 2;
Trying another technique to make a butterfly kite, using thin bamboo, looping the bamboo in to "wing" shapes, two big loops for the top half of the butterfly's wings and two smaller for the bottom half.


Wood split whilst moulding.
Trial 3;


Wood randomly just split after moulding
Trial 4;
Using plastic bin bags and bamboo.
Back to original technique;


Unfortunately I Broke this kite putting it in the car.
Using a different technique;
For this kite I have used a different technique of putting it together and I have changed the material of the kite to a water resistant fabric.
How my kite is made;


When in flight a strong gust of wind broke my kite straight in the centre before I even had chance to document it flying, so I took it back home and repaired it, I also added a pattern with neon pink paint that glows green in the dark.

Delta Kite;

whilst searching on google for other ways to make a butterfly kite I came a cross a few Delta kites that had butterfly patterns on it, so if all fails with my attempt of making a butterfly kite I will make a delta kite with a butterfly pattern.
My Final Kite;

.jpg)


Furthering My Idea;
As much as I do like this Idea, and I would love to have attempted it, I feel this idea is impractical for the amount of time I have to produce the kite I also feel that the kite might not even function, thus I am going to scrap any attempt of making the kite in this fashion.
Half butterfly, half mirror plate, mirror plate strip- mirrors other half of butterfly, mirror plate could manipulate the eye into thinking the wings are fluttering.
As much as I do like this Idea, and I would love to have attempted it, I feel this idea is impractical for the amount of time I have to produce the kite I also feel that the kite might not even function, thus I am going to scrap any attempt of making the kite in this fashion.
Hi Jamie,
ReplyDeleteLots of thinking and great trial and errors here. Good Work!
If by chance you are still furthering your kites??? I have a idea for you that I use on all types of wood for use in kayak designing and building that really works. We put our long wood stringers in a tube and pipe hot water steam into the tube to soften the wood strips. After that while the wood is still wet, I bend and conform it to the stressful new shapes of the hull of the boat. It bends easy and when it dries it's just like it grew that way. It really conforms to the new twists and bends especially at the bow and keel ends. This method also works well for the cockpit coming rims where you sit in the kayak. Oh, these are East and West Greenland style kayaks. Any ways, it will last for years and years after doing this to the wood. Oh, and we also have to pay attention to the grain run out in the wood selections we pick for each kayak. We look for long straight wood grain as possible.
It looks like you need this information on your awesome kites and stuff. If you can't work out a way to steam the wood as a last resort we lay lots of wet rags on the wood for a few hours then it bends good too!
Hope this will help
Keep up the good work!
Dudley Doo