Initial investigation of the V2 Rocket Engine;
When we was given this project and the brief "Industrial objects for non-industrial people" I had a really hard time trying to understand what we were actually meant to do, my initial response was to start researching the V2 Rocket Engine and this is what I found;
"This rocket engine powered Germany's V-2 "Vengeance Weapon" during World War II. The engine was a technical achievement, using high-speed pumps to move large volumes of fuel into the thrust chamber very quickly. Its design also contributed to American rocketry following WWII"
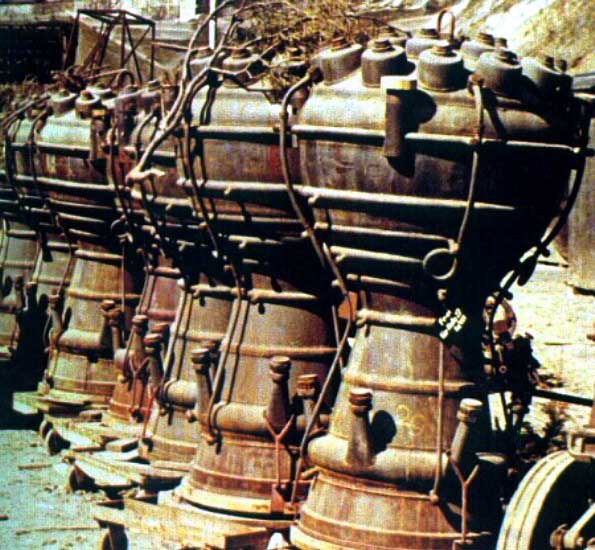 |
| Rusty line up of v2 Rocket Engine body base |
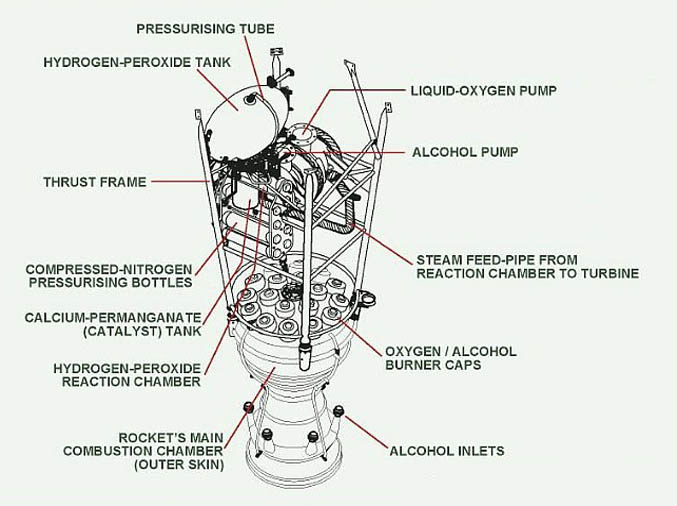
Simple diagram explaining and showing parts of the V2 rocket engine.

Initial drawings;

Initial first drawing done in the first half of the drawing work shop, I feel this image is really 'clumsy' with the quality of line and I feel that the lines, are personally all over the place and not very 'tidy' even after refinement I eel this image is unsuccessful, however, I do like how the background pulls the image off the paper.

This is my second drawing created in the second half of the session, I like this image much more than my previous drawing, here I have experimented more, as you can see I have flipped the image upside down in a sort of mirror image, I have also varied the quality of line.

With this image I have just played with simple effects; this one is a simple black and white focal point, in which the whole image is black and white apart from the main focal [point which you can select manually.
Collagraphs;


First collagraph turned out rather light, in order to correct this I added more ink to the colloagraph and I also added another 'blanket' on to the bed of the press before pressing the image.


These three images all show my collagraph after I had cut the actual shape out from the card i had drew it onto, once again the first image is lighter so I repeated the same process of adding more ink and using a second 'blanket' on the press.

The third image shown above has been produced using grey/charcoal coloured ink-
I did the third by mixing a white and black ink together, I had hoped the ink would have turned out lighter, so you could see the actual grey colour however, I did not remove the second blanket and I also didn't clean the remaining residue from my previous prints.
Further printing using inked metal sheets;


These print were created my drawing straight onto an inked piece of metal, the photograph displayed to the left was my first attempt, the image is slightly lighter than the second image displayed to the right.
Initial model structures;
Drawing plans;

Here is my initial sketch o what I wanted to make or a 3D model just exploring the shape of the V2 Rocket Engine;
Stage one was to simple create the base using any materials I could find be it wood, metal or card, however, the wires in Stage two, I wanted these to be kept to some sort of wire themselves, once again I didn't mind what sort of wire.
Structure One;
Initial model, made out of;
thin wooden sticks
Pieces of metal wiring
Grey cable wire
fastened together using hot glue gun and masking tape.

Unfortunately the model started to lean to the one side after I added different levels I believe that the thin wood was not strong/ sturdy enough to keep the structure standing up right.

I have taken this photograph from this particular angle to emphasis/ exaggerate the size of this model, it is currently a little more than 30 cm.

further photograph taken form a different angle which further shows how the model is leaning to the one side.
Structure Two;
Made using;
Polystyrene
Thin wood
Copper wire
Cable ties


 Once again I have taken photographs of this model using different angles and view points, this model is much smaller than my first model; approximately 10cm.
 Further refining and investigating;
Initial Idea:
Looking closer at the 'hour-glass' figure...
On first breaking down the V2 Rocket Engine shape, I noticed immediately that the base of the rocket has a feminine hour glass figure, this gave me an initial idea to create a non-industrial piece via making some sort of exhibition piece or some sort of garment...
Examples;


Here are three examples that I have picked out that show dresses made from wire, all of which are based on an 'hour-glass' figure.
Initial wire mesh moulding;


Here I have molded some wire mesh into an hour glass shape, this model once again is quite large approximately over 30 cm also the wire was really tough and the sharp edges stabbed me countless of times. I gave the wire mesh to somebody else so they could try and use it in their project.
Making a dress using the predominant features in the V2 Rocket Engine.
Sketches;


Example Two;
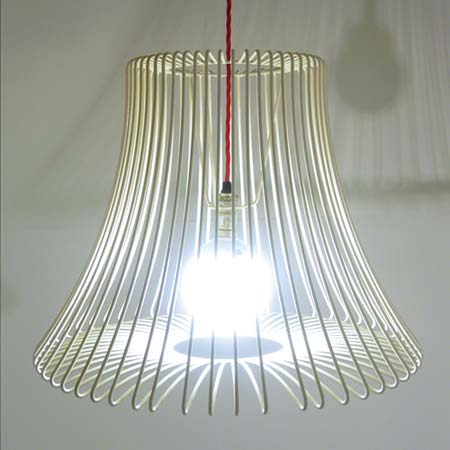
My initial idea was to make the V2 Rocket engine into a household appliance such as a lamp.
Examples;


Here is two examples of a light that uses the same sort of 'hourglass' figure also fashioned in the V2 Rocket Engine.


 Here are further examples of lights using 'wire' another key element that appears predominately within the V2 Engine,
I have also added this image of the 'Rocket' light displayed to the right, this is a more obvious choice as it shows what the main industrial function of the
engine is for as well a 'non-industrial' function.
My Sketches;
Here are my initial sketches of my 'lamp' made from the simple forms used in the V2 Rocket Engine with the fusion of the examples above.
My Sketches;


Further Investigation;
Candle holders, looking at these candle holders I noticed some resemblance to them and the hour glass figure of the V2 rocket engine, here I have layered one on top of the other, to create the extra pipes used on the V2 Rocket Engine.


Making my own candle holder;


Rough models made using bamboo/thin wooden dowel, models are messy and tilt to the one side, Further improvement and refinement could be used but I would prefer to make a lamp.
Starting On The V2 Rocket Engine Inspired Lamp;


Trial one, Finding material to use;


Flexi rod is bendy, but not able to mould.

Using "coat/dress hangers" to make the flexi wire bendable/easier to mould.


with the coat hanger the flexi rod now bends easily.


Need to insert coat hanger further into head on flexi rod so it doesn't flop down like the above picture shows.
Structuring the wire;


Building the base;


I have brought some metallic silver paint to paint all the wooden parts o my lamp so they have a metal quality.


Building the Housing Unit


I've also brought a new bulb holder to sit on top of the housing unit, I feel this one goes better with the aesthetics of the whole lamp, the top half also has a grey tint, which works really well with the rest of the metallic colour I have painted the lamp.

Finishing Piece;


Finished Piece;
This lamp could be used as an art deco/ sculptural piece, I have kept to the theme of the v2 rocket by sculpting wires and painting all wooden pieces silver. I feel this lamp could be used any where, here it is displayed on a kitchen counter.

I feel my lamp looks better when photograph of it are taken in black and white as shown below.


Furthering my idea;
Photography;
Photograph lamp, in gallery space and photographing it on a desk with heaped books and other desk items would make my lamp really stand out
Reconstruction;
Make the legs on the housing unit smaller, I personally feel they are too long, and possibly fix moulding under housing unit, it seems quite squidgy.
No comments:
Post a Comment